
About Foil Over Laminate
There's a reason we reach for printable laminate when a project calls for digital foil. It's not just a protective layer; it's the foundation that makes everything else work better. This technique represents what we consider the gold standard for digital sleeking: foil applied over soft touch lamination on a smooth coated substrate.
The layer stack works like this: we start with a coated substrate (in this case, Explorer 130# Silk Cover), print the full-color CMYK artwork, and apply a soft touch laminate. Then we run the laminated sheet back through the press to print the foil mask, and finally send it through the sleeker to transfer metallic foil onto the printed areas. Each layer builds on the last. The laminate creates a barrier between the print and the foil, improves adhesion, and stabilizes the sheet during this multi-pass process.
We've tested foil on dozens of substrate and finish combinations, and printable laminate consistently produces the most reliable results. It sits at the top of what we call the substrate compatibility pyramid, a mental model we use internally to set expectations for foil quality. Smooth coated stocks work well too, but laminate gives us the confidence to place foil anywhere on the sheet without worrying about adhesion issues or background noise.
Pick up one of these pieces and you'll notice the difference immediately: your fingertips glide across the velvety matte surface of the soft touch laminate, then catch the smooth brilliance of the metallic foil. That contrast between tactile softness and visual shine is what makes this technique worth the extra steps.
Why Laminate?
You might wonder why we add a laminate layer when foil can technically go directly on paper. Here's the honest answer: we've seen what happens when you skip it, and the results aren't always pretty.
The laminate serves three purposes. First, it acts as a barrier. Some ink formulations and paper coatings interact unpredictably with sleeking foil, and the laminate eliminates that variable. Second, printable laminate is specifically engineered to bond well with foil, improving adhesion and coverage consistency. Third, paper shrinks when heated (it's essentially a sponge releasing moisture), and that shrinkage causes registration drift on multi-pass jobs. Laminate helps stabilize the sheet.
Can you foil directly on paper? Yes, and for simple designs on compatible substrates, it works fine. But for projects where foil quality is the priority, laminate is our recommendation. Think of it as insurance that pays for itself in consistency.
Best Practices
Design Considerations
- Design for contrast: Place foil elements against solid colors or imagery where the metallic effect will stand out. The foil should feel intentional, like it's adding something the design couldn't achieve without it.
- Choose bold over fine: Thin lines (under 1pt) and intricate hairline fonts can struggle to pick up foil consistently. Delicate script fonts may need simplification or a subtle stroke weight added. Bold shapes and larger typography produce the most reliable results. That said, printable laminate handles fine details better than paper alone.
- Mind the angles: Sharp points and tight angles don't always transfer foil cleanly. Obtuse angles and smooth curves are more forgiving. Sharp corners may need a small radius, or you can accept some natural softening at the tips.
- Plan for registration tolerance: Digital foil registration typically allows for up to 1mm of movement in any direction. Avoid designs that require foil to align perfectly with printed elements, or build in visual margins that hide small shifts. When tight registration is essential, traditional hot stamping is the better choice.
File Setup Essentials
-
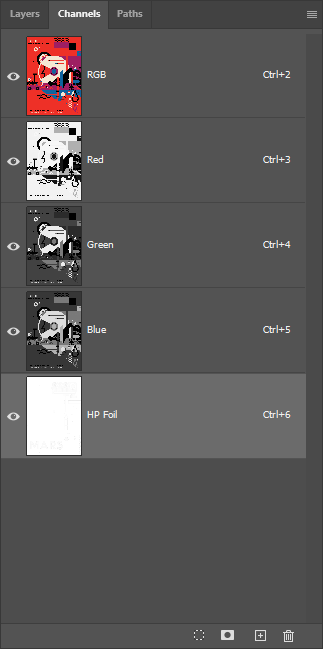
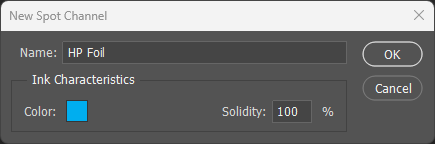
Name the spot channel exactly: The spot color channel must be named
HP Foil(case-sensitive) for the press to recognize it. In Photoshop, create a spot channel; in Illustrator or InDesign, define a spot swatch with this exact name. - Enable Overprint: In Illustrator and InDesign, foil elements must have Overprint Fill and Overprint Stroke enabled in the Attributes panel. Without this setting, the foil will knock out underlying artwork instead of layering on top, leaving unprinted gaps where you expected metallic.
Substrate & Finish
- Choose heavier stocks: Cover weights (100# and up) hold soft touch lamination better and provide a more premium feel. They also remain more stable during the multiple passes required for foil application, reducing the risk of registration drift and sheet-handling issues.
- Coated stocks only: Printable laminate is only compatible with coated substrates (gloss, silk, satin). Uncoated and textured materials cannot be laminated using this process.
Common Pitfalls
- Avoid knockout registration: Designing foil elements as knockouts from the printed artwork creates the most demanding registration scenario. If the foil shifts even slightly, unprinted gaps become visible. Instead, design foil to overprint on top of surrounding color, where small shifts blend invisibly into the background.